Register Today
for In-Depth
CallRail Training
Visit the ParaCore Academy
Timestamps:
[0:45] – About CallRail Numbers
[1:35] – 3 Types of Tracking Numbers
[1:57] – Static Numbers
[3:45] – Dynamic Number Swapping
[4:42] – Enhanced Call Tracking Methods
Transcript:
So, you’ve signed up for CallRail, now what? In today’s video, I’m going to cover how CallRail phone numbers work, including pooled phone numbers versus individual numbers, and I’ll walk you through phone number set up, including the settings. We’ll also touch on how to create separate phone numbers for extensions, landing pages, and websites.
I’m Adam Arkfeld, owner of ParaCore, a pay-per-click lead generation agency. This is the 3rd video of 10 in my Ultimate Guide to Using CallRail for your PPC Marketing. It’s a comprehensive video series for using CallRail, a third-party call tracking system, with your pay-per-click marketing. Once you’re done with the series, you’ll be a call tracking AND CallRail guru. If ever you want to jump to a specific section of the video, we’ve included timestamps in the description below. You can always watch previous videos as a refresher or skip ahead to other videos if I’m covering a topic you’re familiar with.
Back to today’s topic. The concept of CallRail phone numbers is to create tracking phone numbers that forward to your existing phone number. You don’t need to worry about changing your current number. CallRail numbers are real phone numbers owned by CallRail that you use as tracking numbers for your personal or business phone number. These “tracking phone numbers” receive calls that are redirected to your current phone number. What’s great about CallRail and sets it apart from AdWords is that you can add as many tracking numbers as you want. Just keep in mind, the tracking number is what captures all the data.
Generally, you’ll first need to get the tracking script setup on your website. However, you don’t necessarily need the tracking script if you choose an offline tracking method used for things like postcards, business cards, or car wraps. We’ll cover details of the tracking script in greater detail in Video 4 of the series: How to Set-up CallRail Integrations for Your PPC Campaign.
Okay, let’s talk about the setup process. First, you need to determine what level of tracking you’d like to set up. There are 3 options and it’s important you decide on this prior to setting up your numbers. We’ll be going over each in more detail, but they are: 1. Is the number going to be just static? 2. Do you want to track different lead sources on your page or site? Or 3. Do you want to track individual visitors and get enhanced tracking metrics?
Let’s talk about the first option. Static numbers. A static number means the number does not dynamically swap on your page or website. Static numbers are typically for direct mail, print ads, and television. Since we’re talking about pay-per-click, you probably won’t create many static numbers. However, it’s good to know that they don’t technically need to call swapping script that we talk about in the next video. It’s possible you might create a static number and put it on a landing page which we’ve done before. However, we recommend against that strategy in lieu of swapping on the page. Let’s take a look at the setup process for a static number:
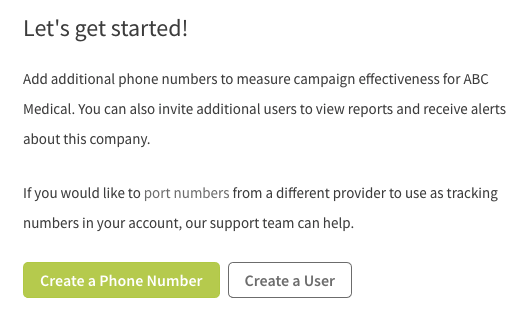 (Figure 3.1: This is what you’ll see when you’re setting it up for the first time.)
If this is your first time setting up a CallRail account, the first thing you’ll do is set up a tracking phone number for your company by clicking “create a phone number” and you’ll be prompted to add a tracking phone number (Figure 3.1 above). Here’s a screenshot of what it looks like once you already have some numbers established (Figure 3.2).
 (Figure 3.2: What active numbers look like in CallRail.)
From here you would click “Add Phone Number.” You’ll have the option to select where the tracking phone number will be used: online or offline (Figure 3.3).
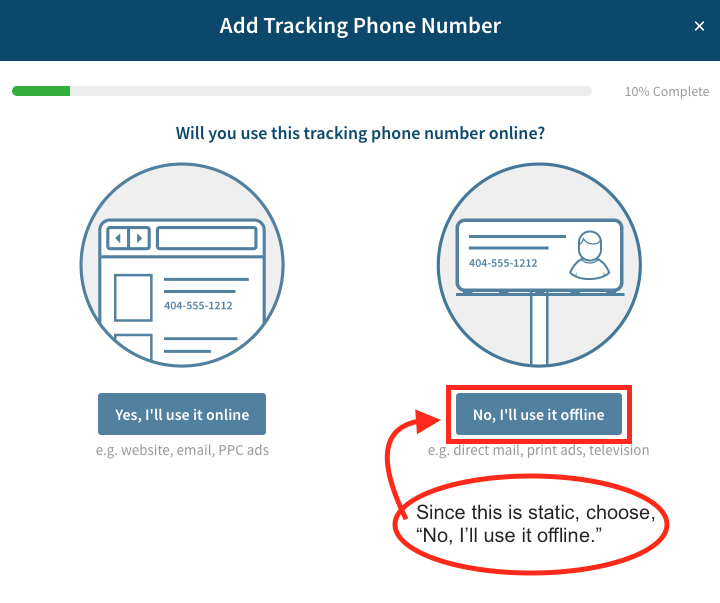 (Figure 3.3: Choose where to add your tracking phone number.)
Since this is static, you’ll choose: No, I’ll use it offline. Then, you’ll add name and destination number and the destination number is typically your primary business number (Figure 3.4).
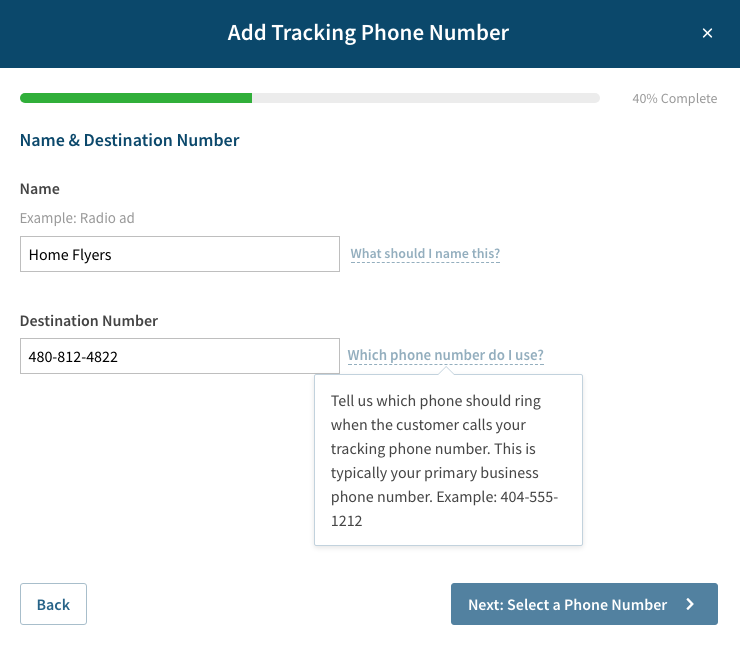 (Figure 3.4: Name the number, and specify where the call come in.)
Technically, even if you’re using the number on your website online, you’d choose offline because it’s static. This means it doesn’t need the number swapping script.
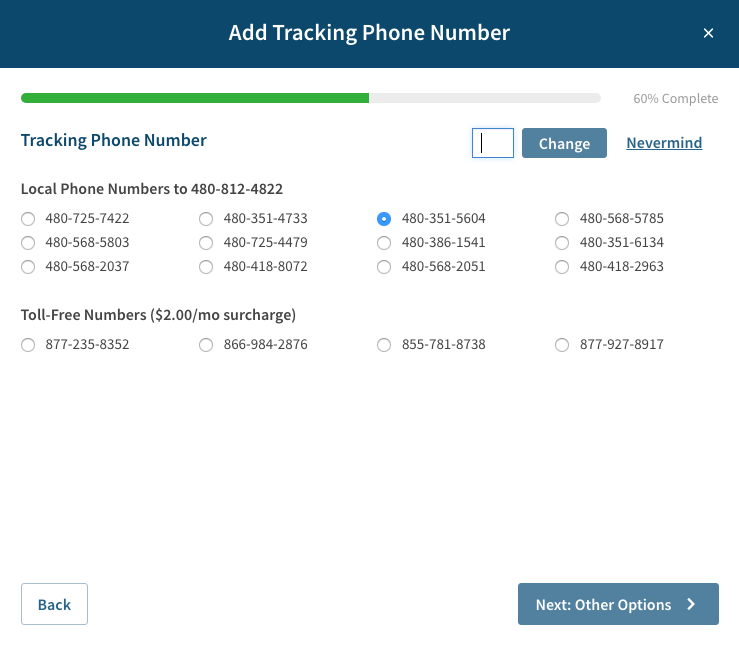 (Figure 3.5: You’ll have plenty of “dummy” phone numbers to choose from.)
Next, you’ll select your tracking phone number from a list with the option of offering toll-free numbers at a cost of $2.00 extra per month (Figure 3.5 above). And finally, you’ll choose your other options (Figure 3.6 below).
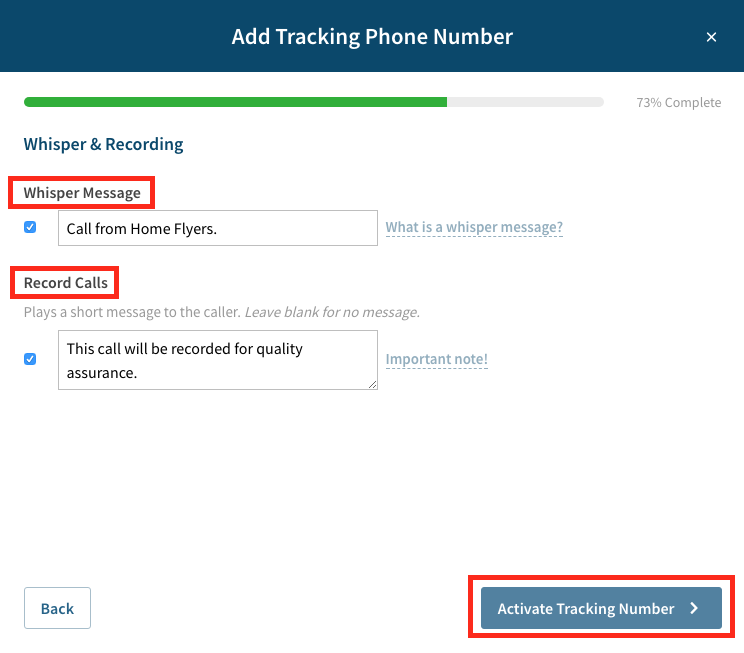 (Figure 3.6: Add a whisper message and/or choose to play a recorded message.)
The additional options you have to choose from are the whisper messages and call recording features that you can add if desired. “Whisper Messages” is a feature that will alert you, the recipient, when you answer your call. The system will say something like, “Incoming call from Google AdWords.” The “Record Calls” feature plays a short message to the caller such as, “This call may be recorded for quality assurance.” Once you’re done, you click the “Activate Tracking Number” and you’ve just setup your static tracking phone number. Now, you can use this number anywhere and the calls with be tracked through the CallRail tracking system. That’s how you setup static phone number tracking.
The second option is dynamic number swapping. Let’s say you want to track different lead sources on your page or website dynamically. This option would be used if you mainly just want to track the lead source and not more advanced metrics like AdWords keywords or individual caller activity. In this option, you set up your phone number to be dynamic so you can track different lead sources on your page or website. What’s great about this dynamic setup is that you don’t need extra information about individual visitors and you can easily change when the number swaps in CallRail.
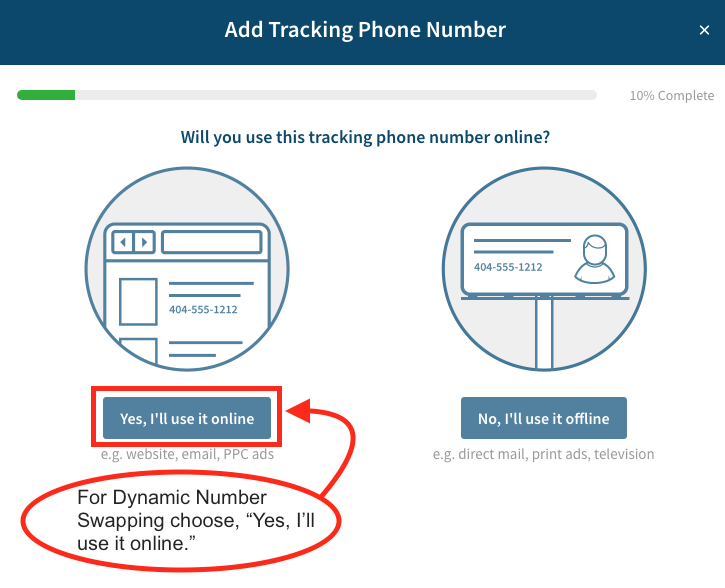 (Figure 3.7: You’ll be prompted again to choose where you’ll use the number.)
The process is the same as before, you’ll add a phone number; then, when prompted where to use it you’ll choose the option, “Yes I’ll use it online” (Figure 3.7 above, then Figure 3.8 below).
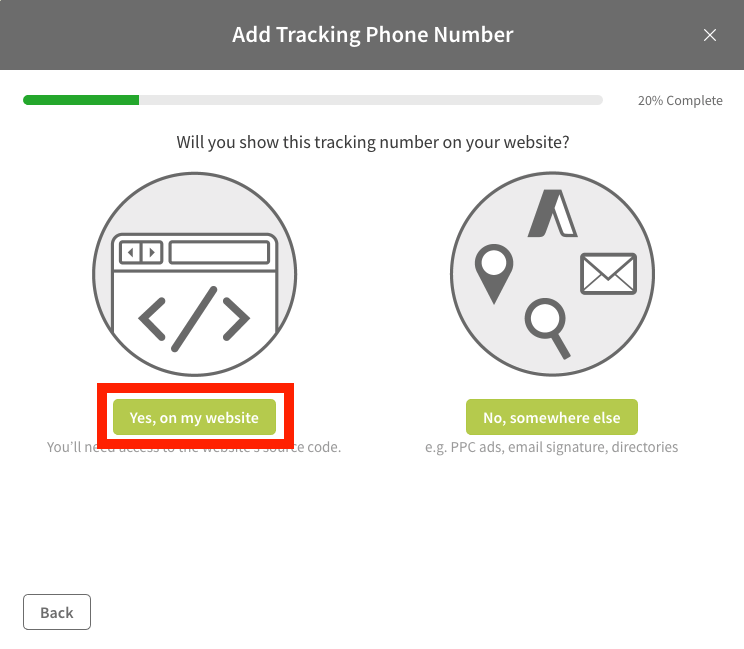 (Figure 3.8: Yes, on my website.)
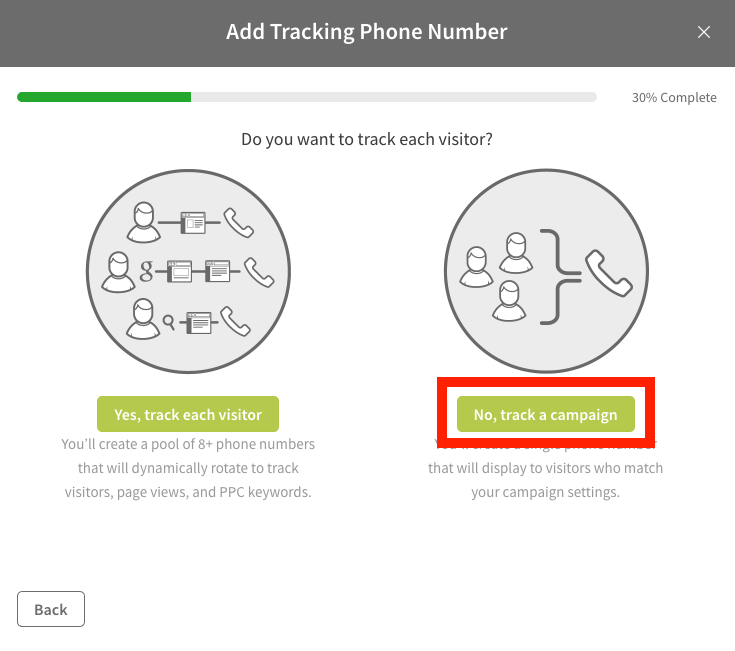 (Figure 3.9: No, track a campaign.)
Select the option, “Yes, on my website” then choose “No, track a campaign” (Figure 3.9 above).
After that you’ll select a name and destination number, then you’ll set up the tracking source (Figures 3.10 and 3.11 below).

(Figure 3.10: Name the number and where the call should come in.)
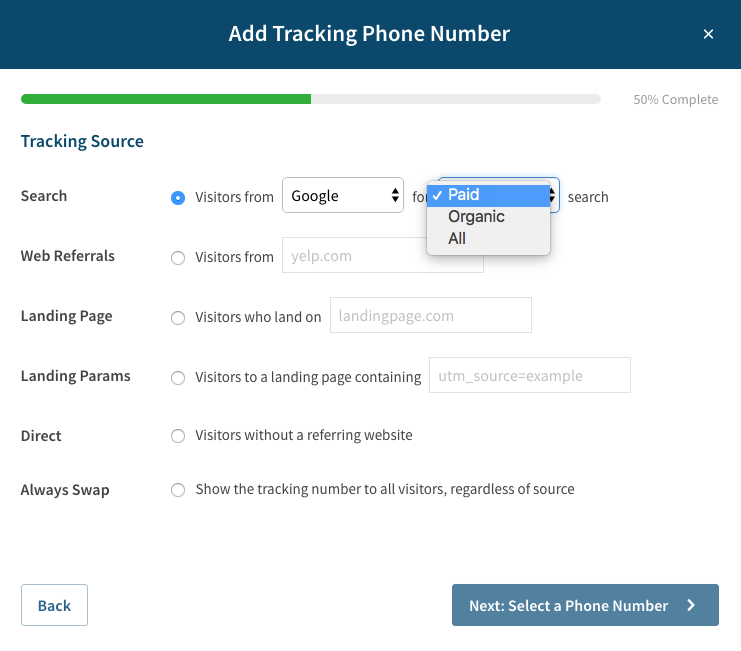 (Figure 3.11: Choose the source that you’re tracking.)
For example, visitors from Google paid ads. Select the phone CallRail number you want to use for your ad and again, it’s two dollars extra for toll-free, then turn on whisper messages and call recording if desired (Figures 3.12 and 3.13 below). In order to use this dynamic option, you’ll need to add the number swapping script to your site that we talk about in the next video.
 (Figure 3.12: Pick a “dummy” phone number.)
 (Figure 3.13: Add a whisper message and/or choose to have a recording play)
Your 3rd and final option is to track individual visitors with enhanced tracking metrics. For example, with enhanced tracking you can see keywords that triggered the lead from AdWords, pages the visitor viewed, or URL variables used on the landing page. This option is also great if you want to see extra information when following up with your leads. It requires a pool of at least 4 phone numbers, which can add up with multiple campaigns and a lot of numbers. As an added caveat: you’re charged by the number, so keep that in mind too.
So: as before, the process is the same: add a phone number; when prompted where to use it, choose “Yes I’ll use it online.” Then you’ll choose “Yes, on my website,” and “Yes, track each visitor” (Figures 3.14, 3.15, and 3.16 below).
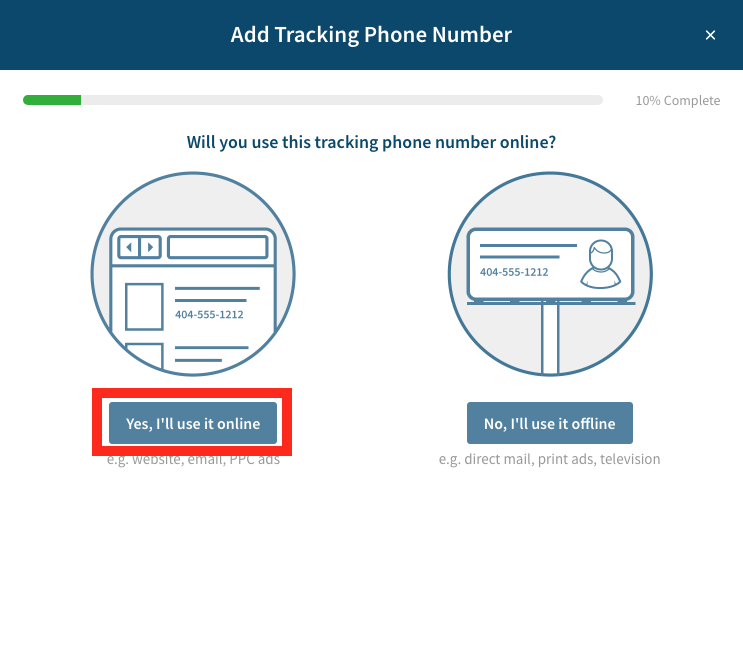 (Figure 3.14: Again, select where you’ll use the number.)
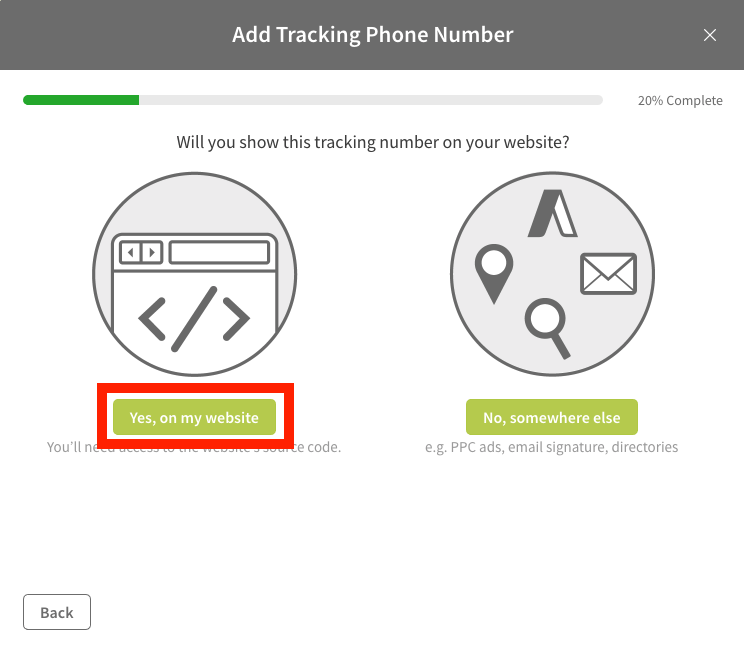 (Figure 3.15: Yes, on my website for this option.)
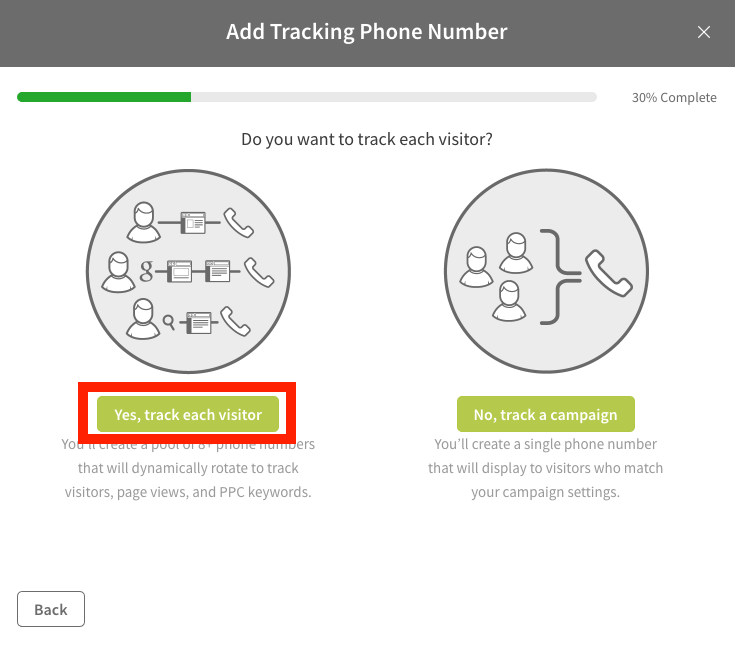 (Figure 3.16: This time choose “Yes, track each visitor.”)
This time the name and destination page will have an extra option for keyword pooling. Again, you’ll want at least 4, but CallRail historically recommended eight (Figure 3.17 below).
 (Figure 3.16: This time choose “Yes, track each visitor.”)
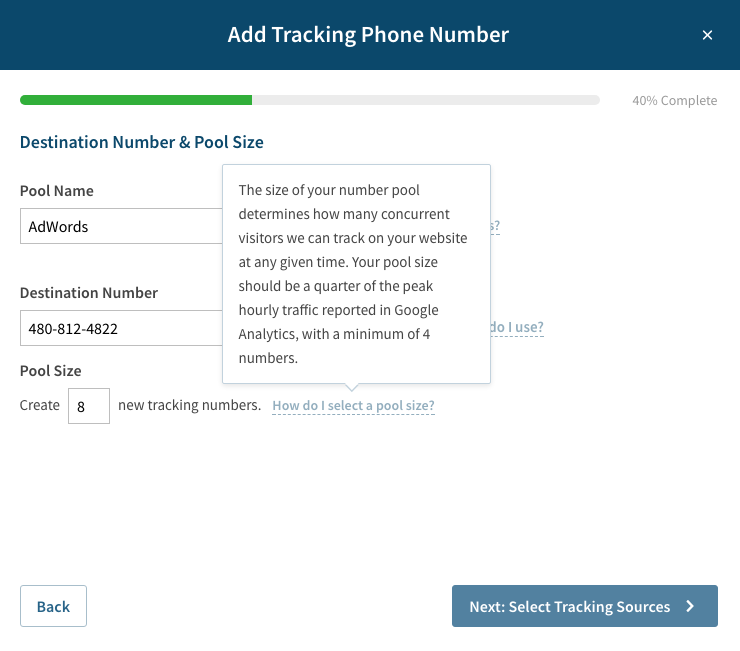 (Figure 3.17: Choose at least 4 for your Keyword Pool.)
 (Figure 3.18: Choose your source.)
 (Figure 3.19: Pick your “dummy” phone number.)
 (Figure 3.20: Add a whisper message and/or play a recorded message for the caller.)
Select the tracking source, select your phone number — two dollars extra for toll-free — turn on whisper messages and call recording if desired, activate your tracking number and you’re done (Figures 3.18, 3.19, and 3.20 above)!
To recap, you have 3 scenarios when creating tracking numbers. The first is static numbers, which are generally used offline. The second is dynamically swapping a single number, and the third is dynamically swapping using a pool of numbers to get extra tracking information from your visitors and leads.
Okay, so now that we’ve covered set-up thoroughly, let’s talk briefly about phone number settings and what you can do with them. You’ve set-up your tracking numbers, so go into the phone number settings, which is the pound sign icon at the top of the page (Figure 3.21).
![]() (Figure 3.21: Click on the pound sign/notebook icon.)
(Figure 3.21: Click on the pound sign/notebook icon.)
Click on the number name, for example “AdWords Landing Page,” and you’ll see you can change or update your number settings, including the name of your tracking number. The name is used to identify the number or source in reporting so it’s important that you name it something specific like “AdWords Landing Page.”
![]() (Figure 3.22: Set-up your “Tracker Name” and other options, such as destination phone number.)
(Figure 3.22: Set-up your “Tracker Name” and other options, such as destination phone number.)
Call flow, the second setting option, allows you to control how calls are handled (Figure 3.22 above). With call flow, you can decide if you want the call to just go to a number or use a preconfigured call flow with more advanced options like call routing, scheduling, and voicemails. If you’re numbers are dynamic, the dynamic number insertion setting requires you to select the swap target (Figure 3.23 below).
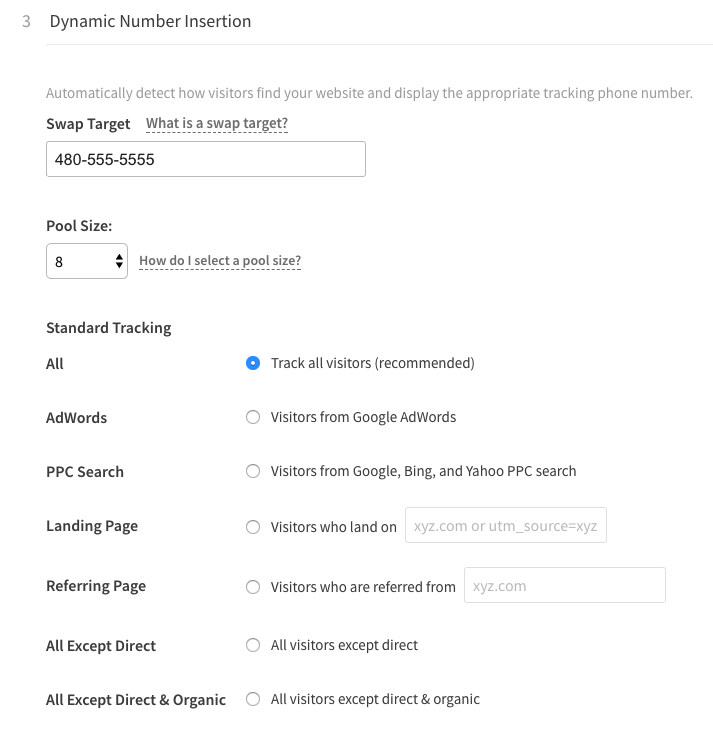 (Figure 3.23: Select a pool size of at least 4 or more)
This is the number that will be swapped by CallRail. You’ll then choose the source of traffic that triggers the swap of this specific phone number. You have lots of options like organic search traffic, paid traffic, referral sources, or even specific UTM tags.
The text messaging option allows mobile phone users to send text messages to numbers in your tracking pool just as if they were cell phone numbers.
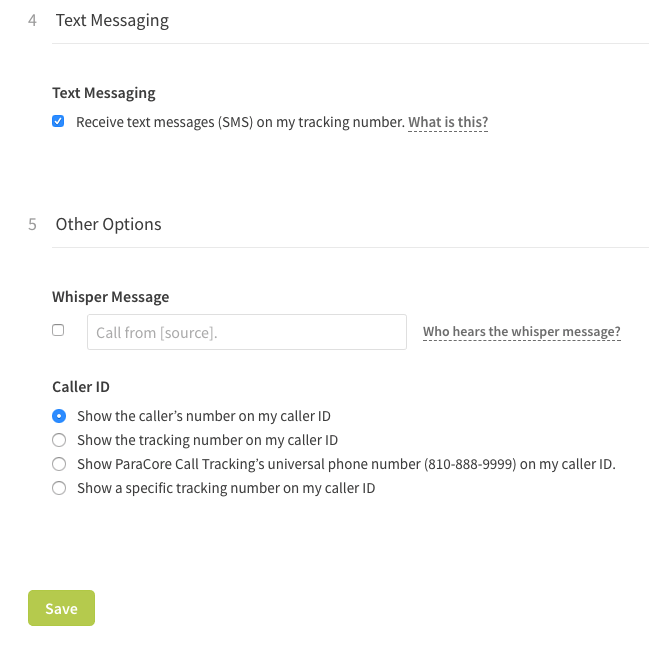 (Figure 3.24: Set-up text messaging.)
You can communicate via text, including receiving details and working out those details (Figure 3.24 above). You can also manage this in the Lead Center, and receive notifications when a text comes in. Your other options are including a whisper message which is a short message that plays to the call recipient before the call is connected. The caller does not hear this message. It will usually say something like, “call from Facebook.” For this particular setting, you also have different options for the caller ID, such as showing the caller’s number on your caller ID. You may want your cell phone caller ID to show the tracking number instead of the caller’s number. If you decide to show the tracking number instead of the caller’s number, you can add that number as a contact in your phone named something like “PPC Lead.” That way, whenever someone calls your tracking number, your caller ID will say PPC Lead and you’ll know that’s a lead call that you should probably answer. Otherwise, you will see many random numbers come through and many of those could likely be spam.
You can also setup a Google Analytics integration to track calls as events in your analytics platform. These goals can then be pulled back into AdWords or you can use them in your standard AdWords reporting.
So, there you have it, that’s your overview of creating and using phone numbers in CallRail. Make sure you check out our next video about setting up CallRail integrations for your PPC campaign.
If you enjoyed this video, please click the like button and make sure you click that red subscribe button below this video to receive updates on this series and more. Also, we’d like to hear from you. If you have questions or comments please post them below and I’ll see you in the next video!
Related Posts
- CallRail: Text Messaging
- CallRail: Integrations Overview
- CallRail: How to Block Spam Calls
- CallRail: Call Tagging
- CallRail: Notifications Overview
- CallRail: Activity Dashboard Overview
- CallRail: Interface Overview
- CallRail: Call Flow Tutorial
- CallRail: Form-to-Call Lead Handling
- CallRail: Multi-touch CPL Feature
- CallRail Keyword Spotting & Auto-tagging
- Call Tracking Overview
- CallRail Local Number Swap
- CallRail Bonus Features
- Using CallRail for Customer Service
- Call Flow Options
- Reporting With A Purpose
- Call Tagging, Scoring & Lead Classification
- CallRail Notifications
- How to Setup CallRail Integrations for Your PPC Campaign
- Call Tracking Explained
Register Today
for In-Depth
CallRail Training
Visit the ParaCore Academy
Previous Video
Previous BlogCall Tracking ExplainedCurious how we can improve your campaigns?
Schedule some time to chat with our team so we can learn more about you and your business.

