Want In-Depth PPC Training?
Visit the ParaCore AcademyTimestamps:
[0:55] – What are Call Flows?
[1:30] – Setting up Call Flows
[1:45] – Creating a Call Flow
[2:10] – Greetings
[2:25] – Dial
[3:13] – Simulcall
[3:43] – Round Robin
[4:15] – Menu Option
[4:58] – Schedule
[5:21] – Geo-Routing
[6:03] – Responsive Routing
[6:23] – Tag
[6:32] – Voicemail & Hang-up
Transcript:
When you run a business you’re not always in-office or even available to take a call, let alone track one. So, what do you do when you’re out in the field working with customers, or having meetings? What if only one person is available in the office, or no one is available? Maybe it’s the weekend and you’re missing a lot of calls because it’s not during normal business hours. This is perhaps one of the easiest pain points to alleviate using CallRail’s Call Flow features, which we’ll be covering in today’s video.
I’m Adam Arkfeld, Owner of ParaCore, a lead generation company for PPC advertising. This is the 8th video of 10 in my Ultimate Guide to Using CallRail for your PPC Marketing. It’s a comprehensive video series for using CallRail, a third-party call tracking system, with your pay-per-click marketing. Once you’re done with the series, you’ll be a call tracking and CallRail guru. If ever you want to jump to a specific section of the video, we’ve included timestamps in the description below. You can always watch previous videos as a refresher or skip ahead to other videos if I’m covering a topic you’re familiar with.
So, what is a call flow and why should you care? As the term indicates, a call flow is the path a call takes when someone dials your tracking number. As an example, when a potential customer calls your business, the call flow might route the caller to the appropriate department depending on the time of day and where they’re calling from. This could be the cell phone of someone off site, or simultaneously ringing three people in a department. It could also be as simple as an answering machine, but there are a variety of options at your disposal. Essentially, a call flow gives you tremendous flexibility in how calls are routed to different people in your, or your client’s organization. Today we’re going to talk about how to set one up and the different options at your disposal in CallRail.
There are several ways to set-up call flow, depending on how you want to forward the calls that are coming into your business. It’s a simple process, so let’s jump right in. The Call Flow feature can be accessed and set-up in the Numbers screen of CallRail (see Figure 8.1 below). Once you set-up Call Flows you’ll see them listed on this page.
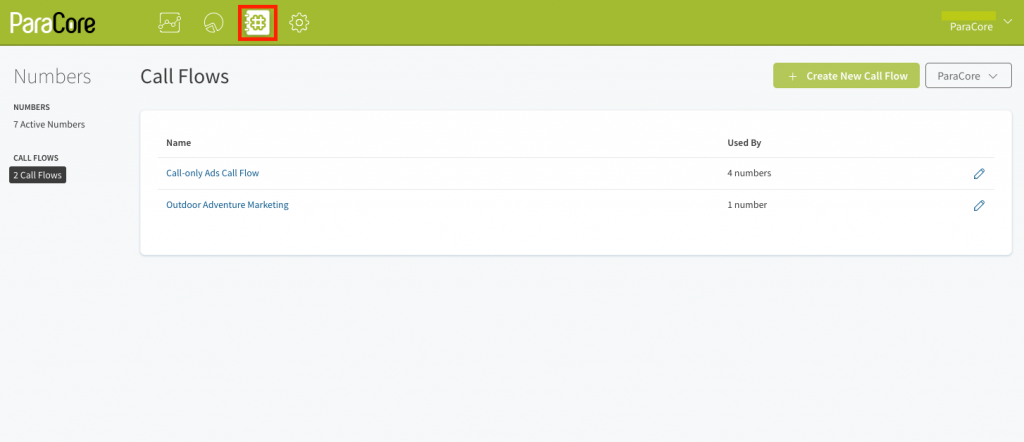 Figure 8.1: This is where you access Call Flow in the Numbers screen.
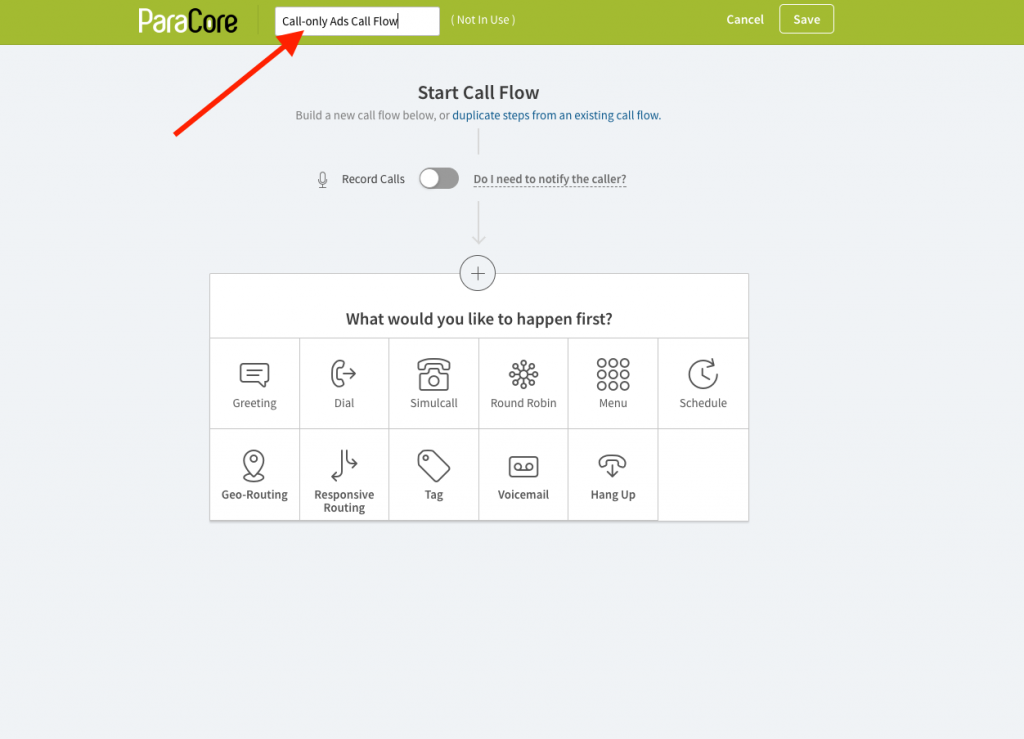 Figure 8.2: Name your Call Flow something specific.
When creating a new call flow it’s best to name it something specific to its purpose, for example, “Call-only Ads Call Flow” (see Figure 8.2 above). We’ll cover each Call Flow feature listed, but first a word about recording phone calls.
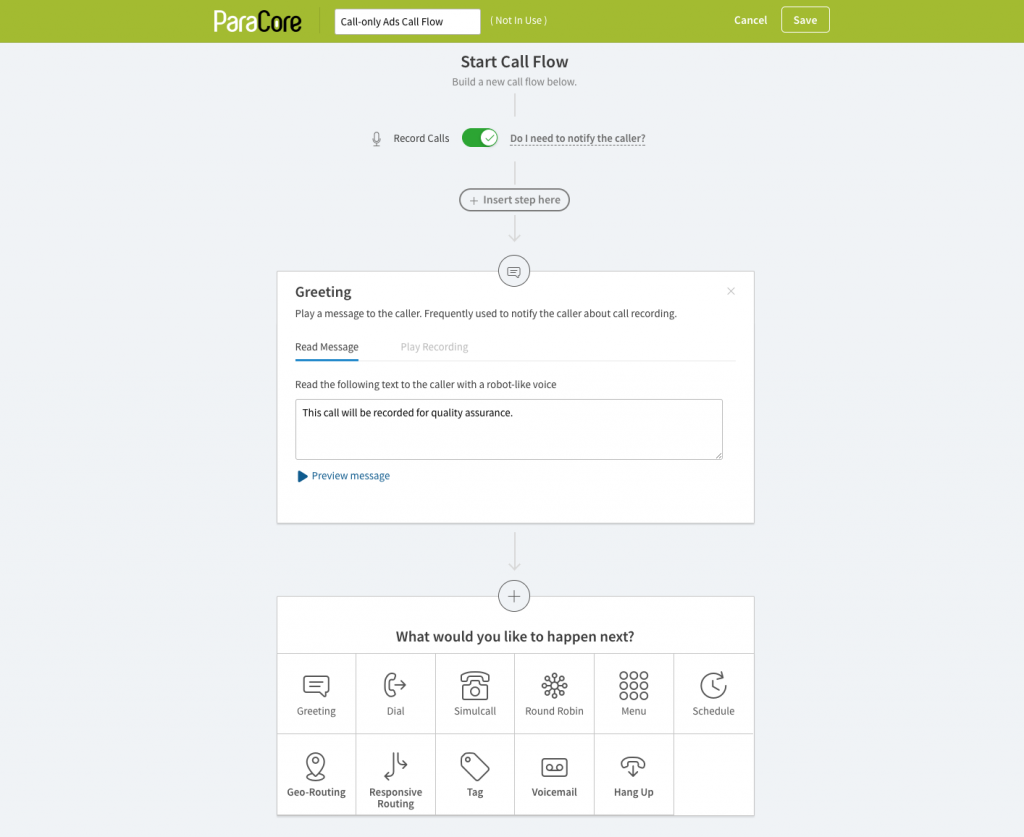 Figure 8.3: Recording calls and Greeting notifications.
You can turn on the feature to Record Calls; however, be mindful that the laws are different in each state. By turning on call recording you’ll want to give the caller explicit notifications that their calls may be recorded for quality assurance. You can do this in the Call Flow Greeting feature (Figure 8.3 above). You can set it up to play a default recording, or play a recording of your own voice. You can also preview the message to experience what the caller will hear. Call Flow greetings can be set-up even if you’re not using call recording.
The first and most basic call flow option is the dial option. The Dial feature allows you to forward phone calls from your tracking number to your cell phone, or another number.
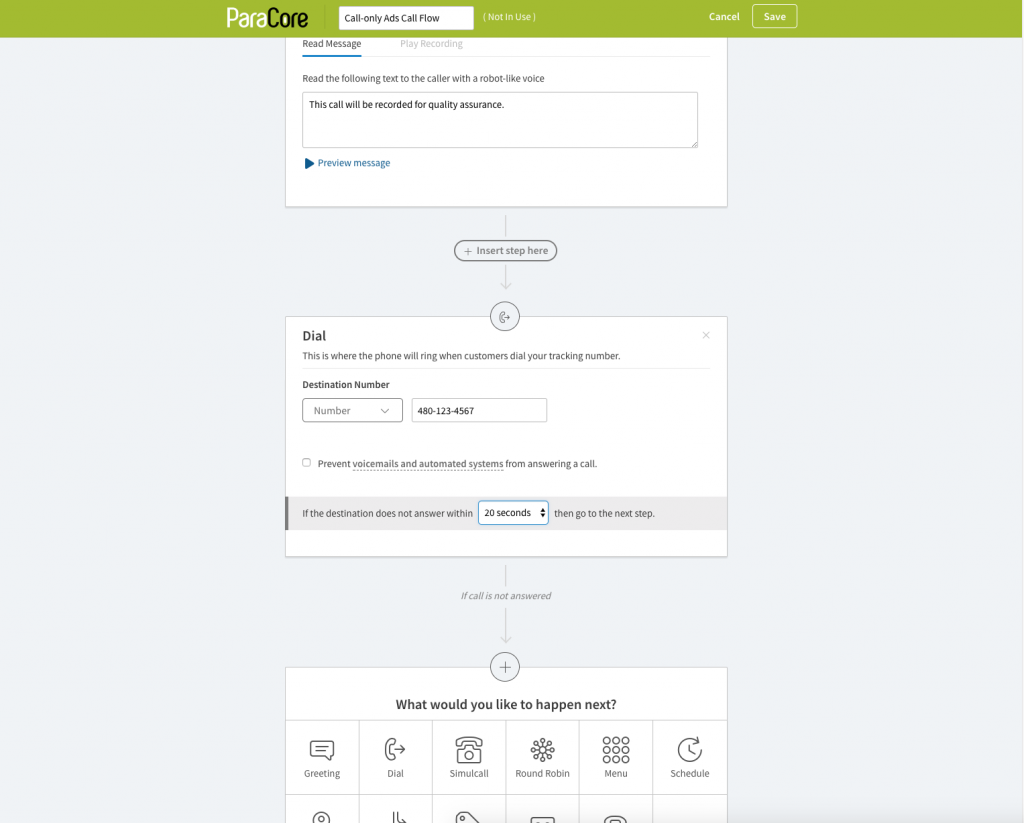 Figure 8.4: Check the box to prevent voicemails and automated systems.
AND
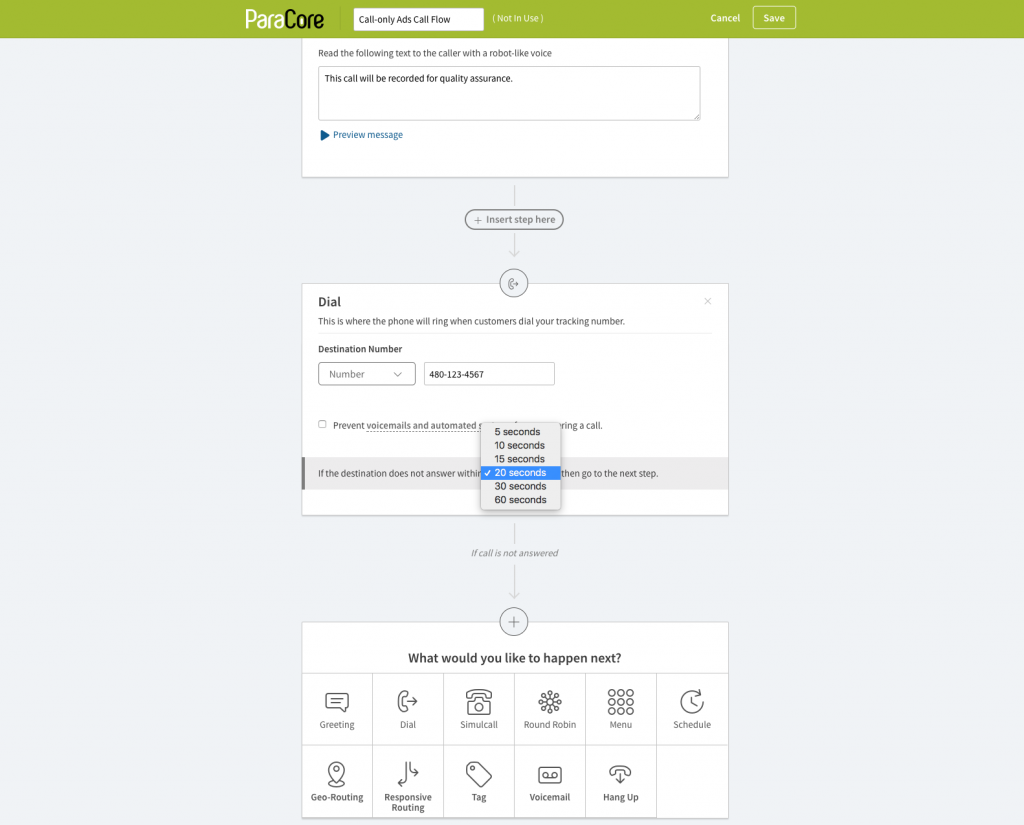 Figure 8.5: If the call isn’t answered in 20 seconds, define the next step.
In the Dial settings, you have an option to prevent voicemails and automated systems from answering a call (Figure 8.4 above). The option allows you to choose whether or not the caller will connect to an automated system or simply go to the next step automatically. If you don’t select this option, callers might be taken into an automated system and not enter your subsequent call flow steps. That might not be good if you’re wanting callers to progress through your system. Next, designate what happens if the call isn’t answered in a set amount of time (Figure 8.5 above). For example, if no one answers the call within 20 seconds, send the call to the next step. You don’t have to use every option in this video for callers, but if you want to provide as many options as possible to callers. There are no limits.
Let’s talk about another call flow option called Simulcall. The Simulcall feature rings multiple phones simultaneously. Whoever answers first, gets the call. You can also start a call flow this way if you have multiple employees in charge of answering calls.
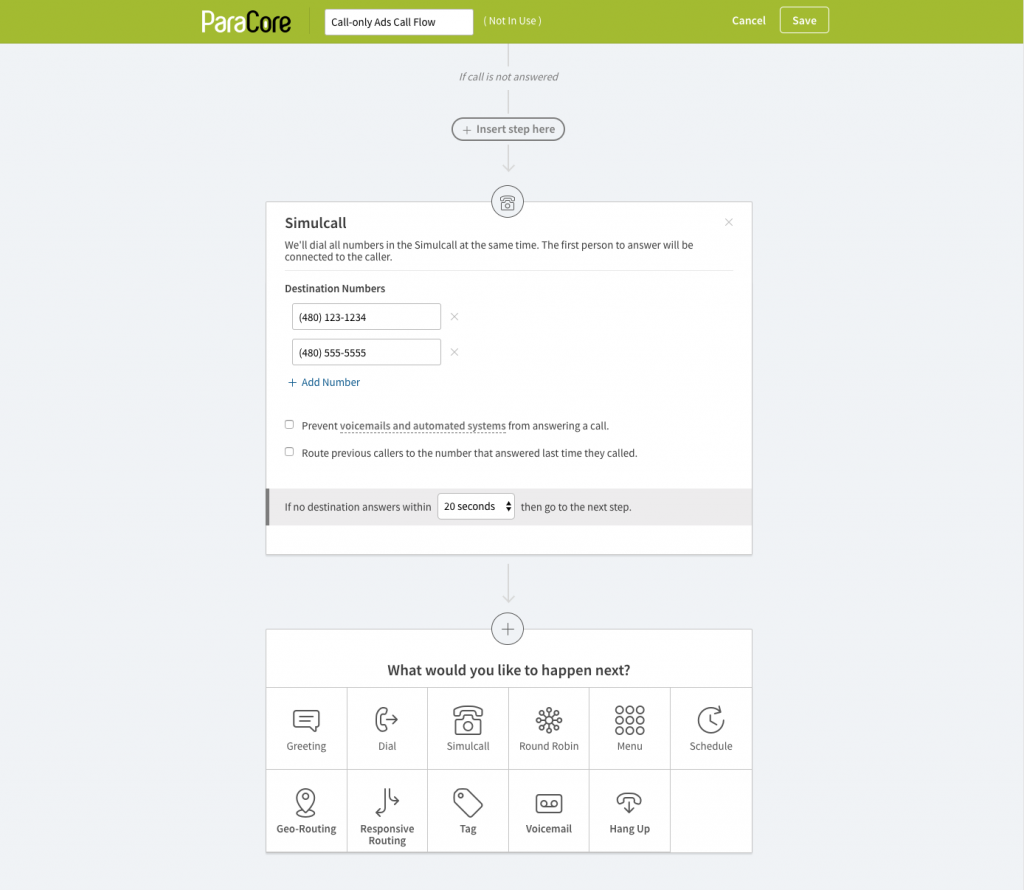 Figure 8.6: Setting up Simulcall.
You have two options with the Simulcall feature (see Figure 8.6 above). You can prevent voicemails and automated messages, which we just covered, and route previous callers to the number that answered the last time that specific caller called. These are straightforward options, but if someone still isn’t available to answer, pick the time frame from the dropdown menu and set-up the next call flow step.
The round robin option lets you set the order in which each person or employee will receive the call (Figure 8.7 below). You can have it progress to the next number on the list if the designated recipient doesn’t pick-up. For example, if Harold doesn’t pick-up the call in 20 seconds, it will go to Sarah next, and so on.
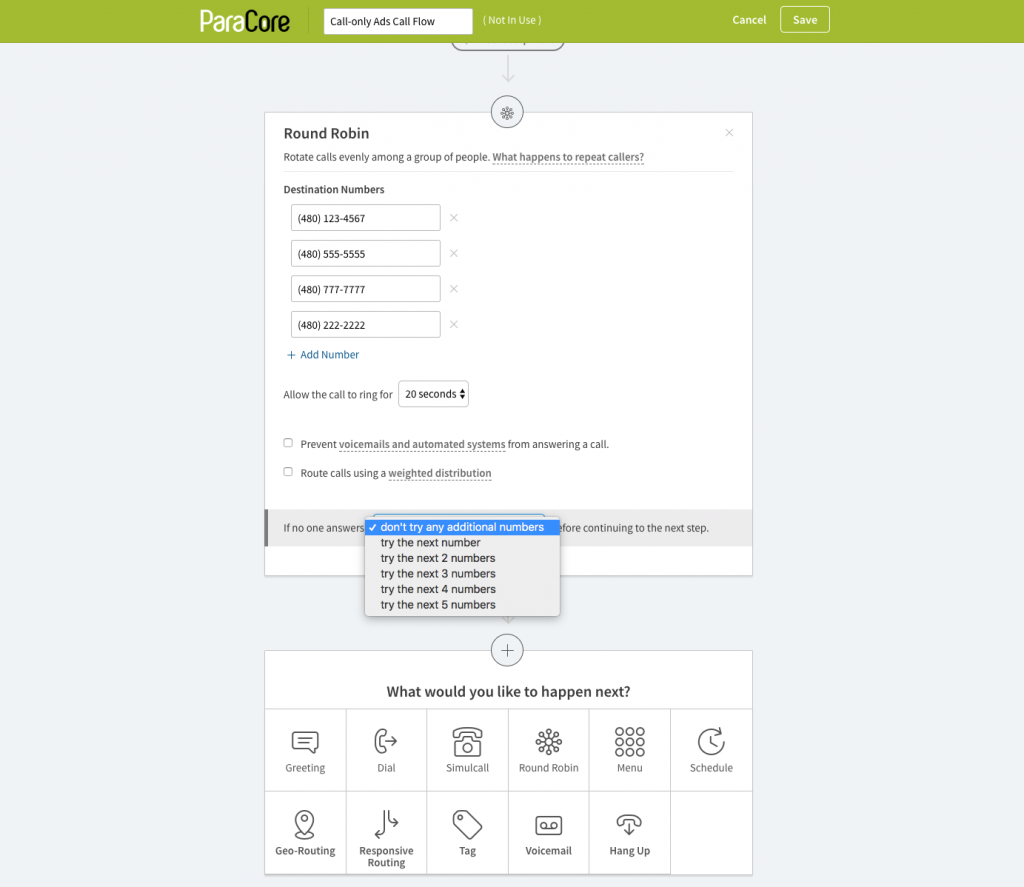 Figure 8.7: Set-up your Round Robin Call Flow.
Again, you have the option to prevent voicemails and automated systems. In this option, you can also route calls using a weighted distribution instead of evenly distributing calls to your pool of recipients (see Figure 8.8 below). You might use a weighted distribution if one of your recipients is training, new, or has a dual role and you don’t want him to receive a full load of calls.
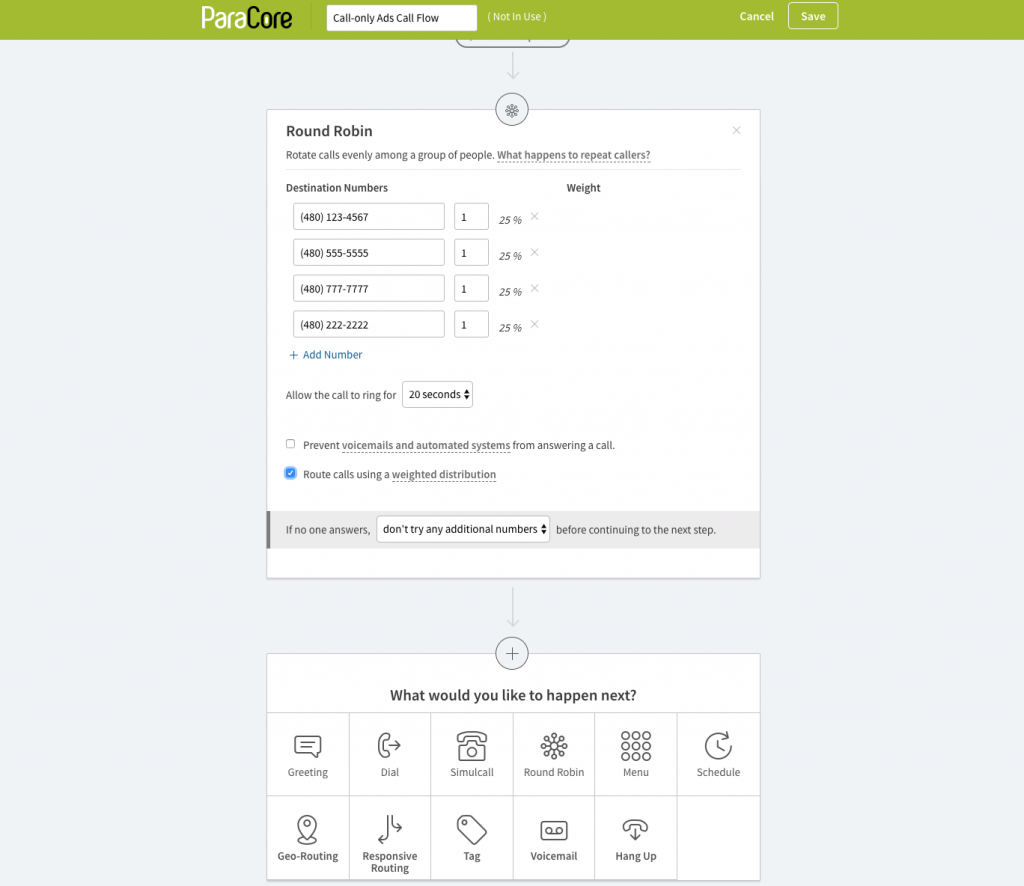 Figure 8.8: This is how it looks when you set-up a weighted distribution.
Another option that can happen at any point in the call from beginning to end is the Menu option. For example, you can start the caller off with a menu option, or give them a menu option after an initial transfer has taken place.
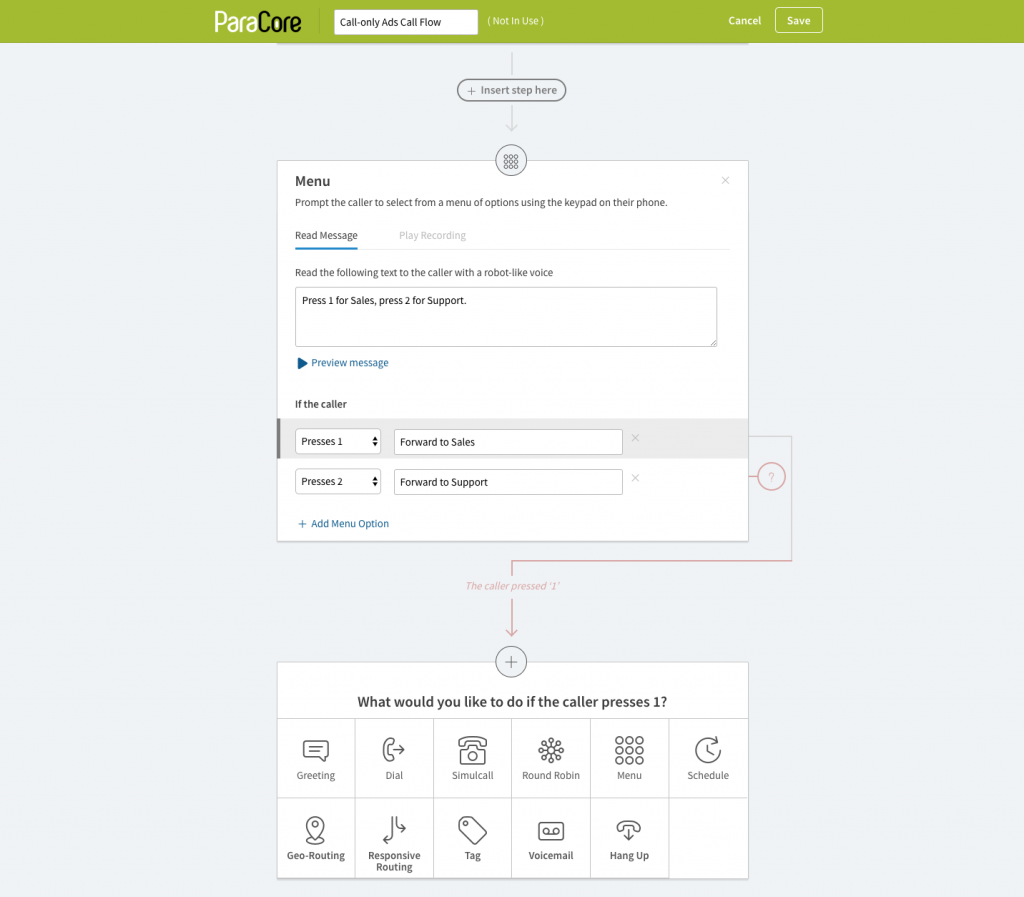 Figure 8.9: Menu option set-up.
The Menu option is where the caller gets a list of options from an interactive phone menu. For example, Press 1 for Sales, Press 2 for Support, and so on (see Figure 8.9 above). Just like with the Greeting call flow feature, you can record your message or use the default recorded voice. After you’ve listed all the potential options, you can specify where the call should go. For example, if the caller presses 1, forward the call using the Dial feature to the sales department number, or you can use another call flow feature instead (see Figure 8.10 below). Many companies have phone systems that offer a similar menu option, but CallRail’s other features allow you to take routing to the next level.
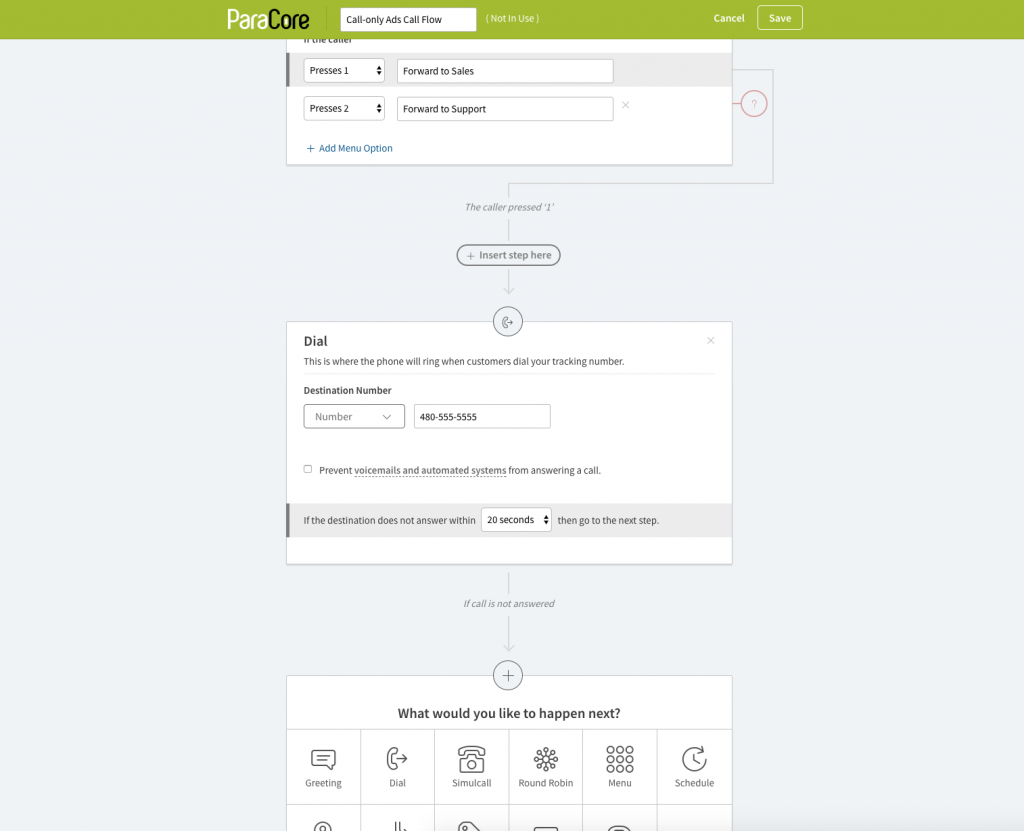 Figure 8.10: Dial Call Flow: For dialing a specific number or department.
Perhaps one of the most beneficial call flow features on the list of choices is the Schedule feature which allows you to determine where your callers will be routed based on the time of day.
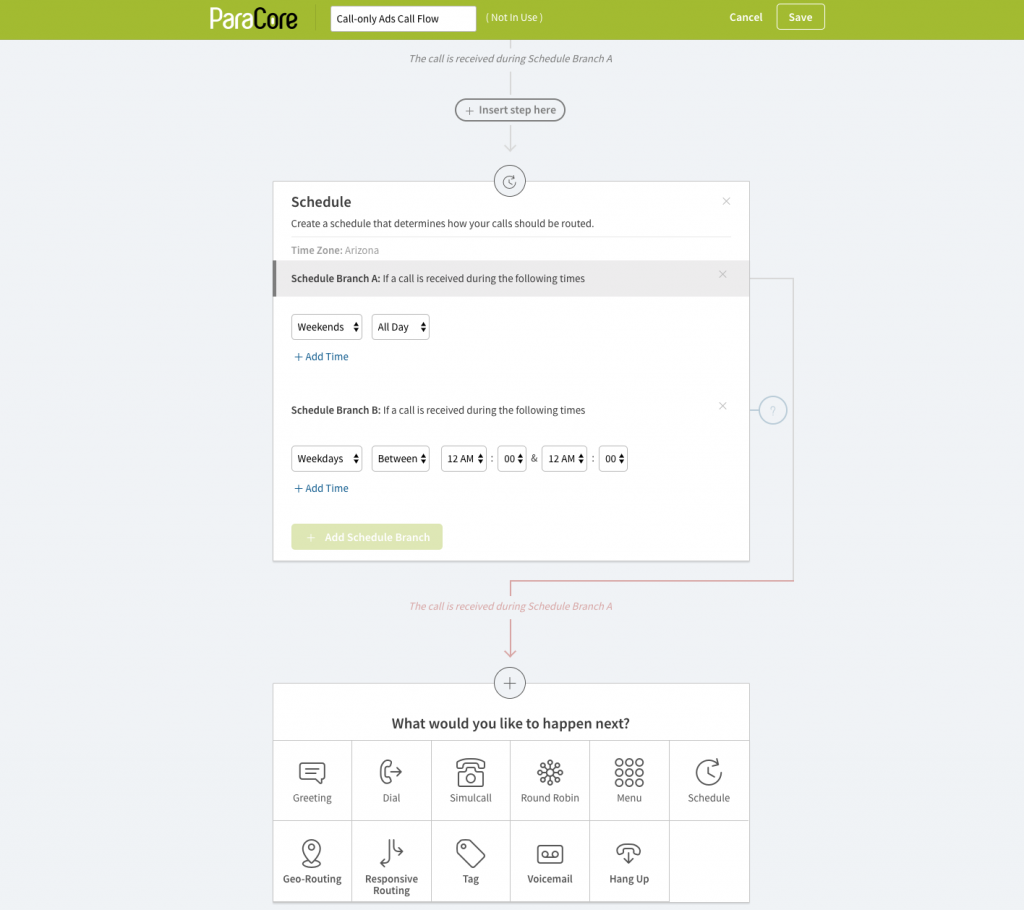 Figure 8.11: Schedule Call Flow set-up.
For example, choose weekends from the dropdown menu, then choose All Day, or specify the hours (see Figure 8.11 above). Then, choose where you want the caller to go. You might want calls routed to a call center on the weekends but your employees during the weekdays. Or maybe it’s the holidays and you send them to voicemail.
Next up, the Geo-Routing Call Flow feature allows you to handle calls by the caller’s area code or even zip code. For area codes, you can cluster by city or state location and include as many area codes as that city or state location may contain. For example, Location 1 might be all of the Greater Phoenix area codes (see Figure 8.12 below). Then, if the caller’s area code matches Location 1, you can send it to a specific recipient, simultaneously ring multiple lines, or perhaps do a Round Robin.
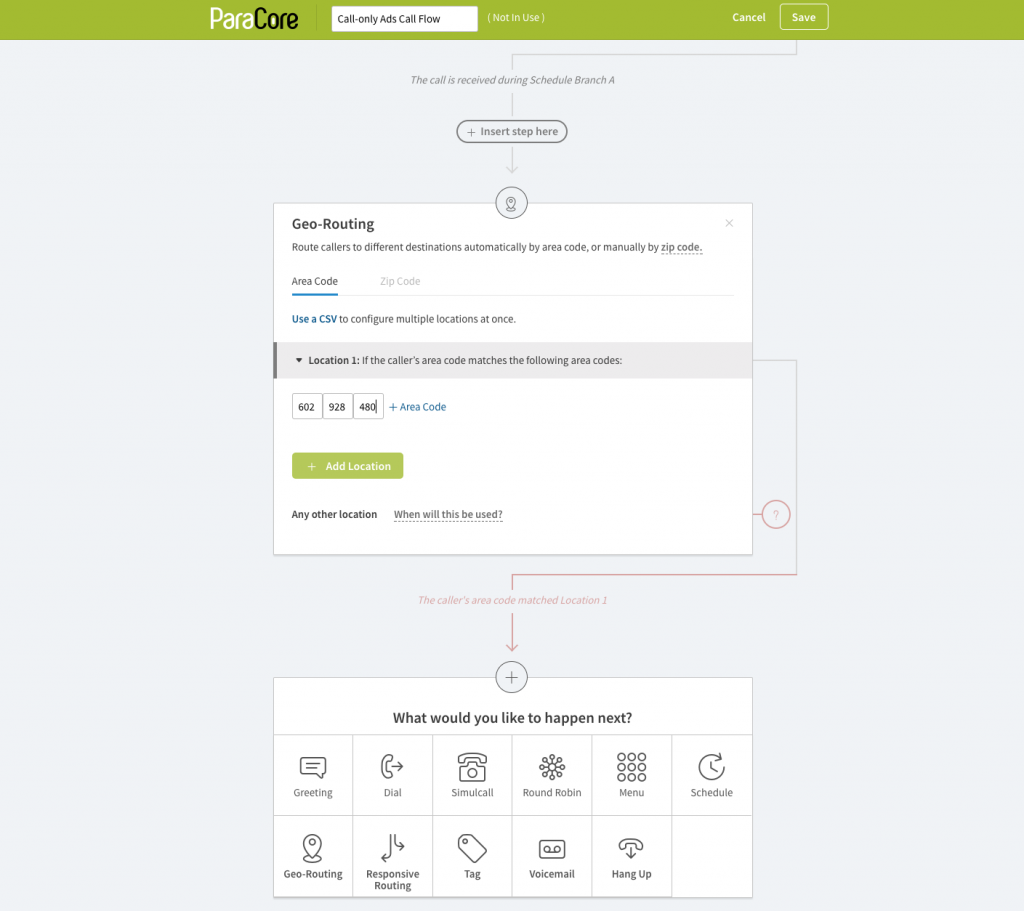 Figure 8.12: Geo-Routing: Area Codes.
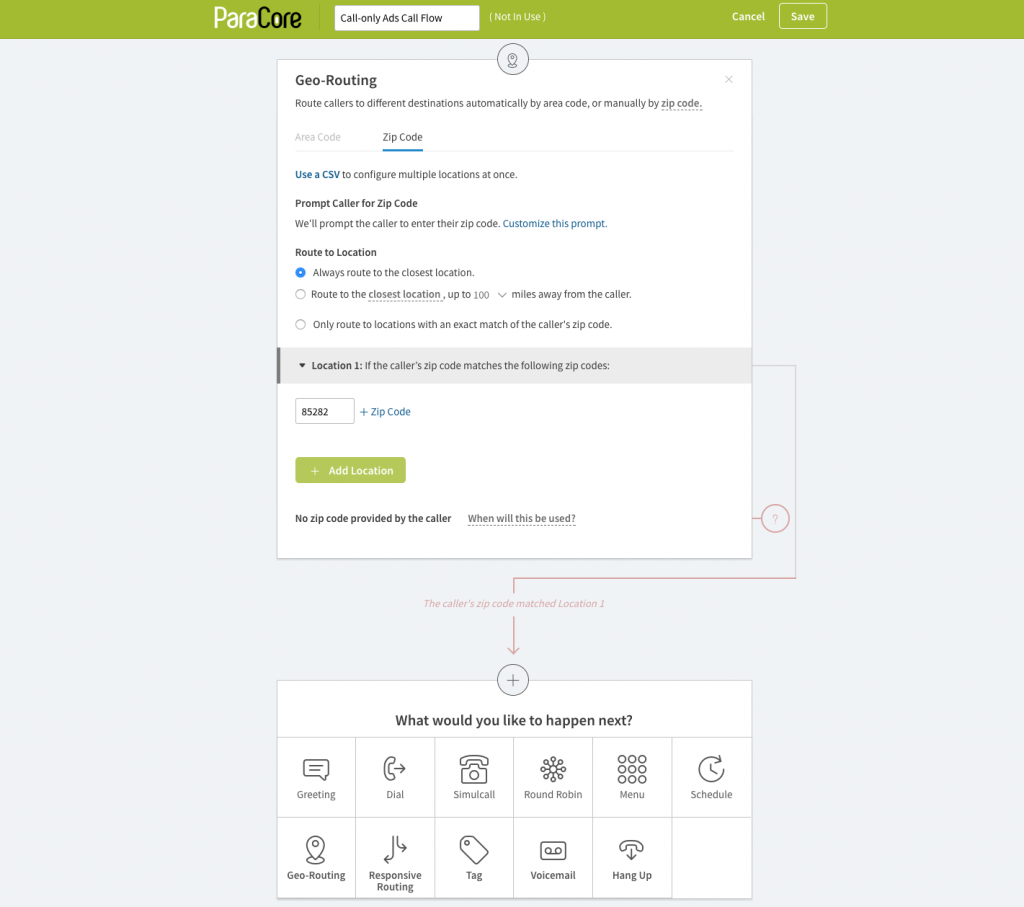 Figure 8.13: Geo-Routing: Zip Codes.
On the other hand, if your calls are tracked by zip code and you have multiple business locations, you can have the closest location take the call. Or perhaps you have remote sales people, so you’ll want to route the call to the closest location up to let’s say 100 miles. So, you set-up the call flow to route all calls from zip code 85282 to the Phoenix sales rep.
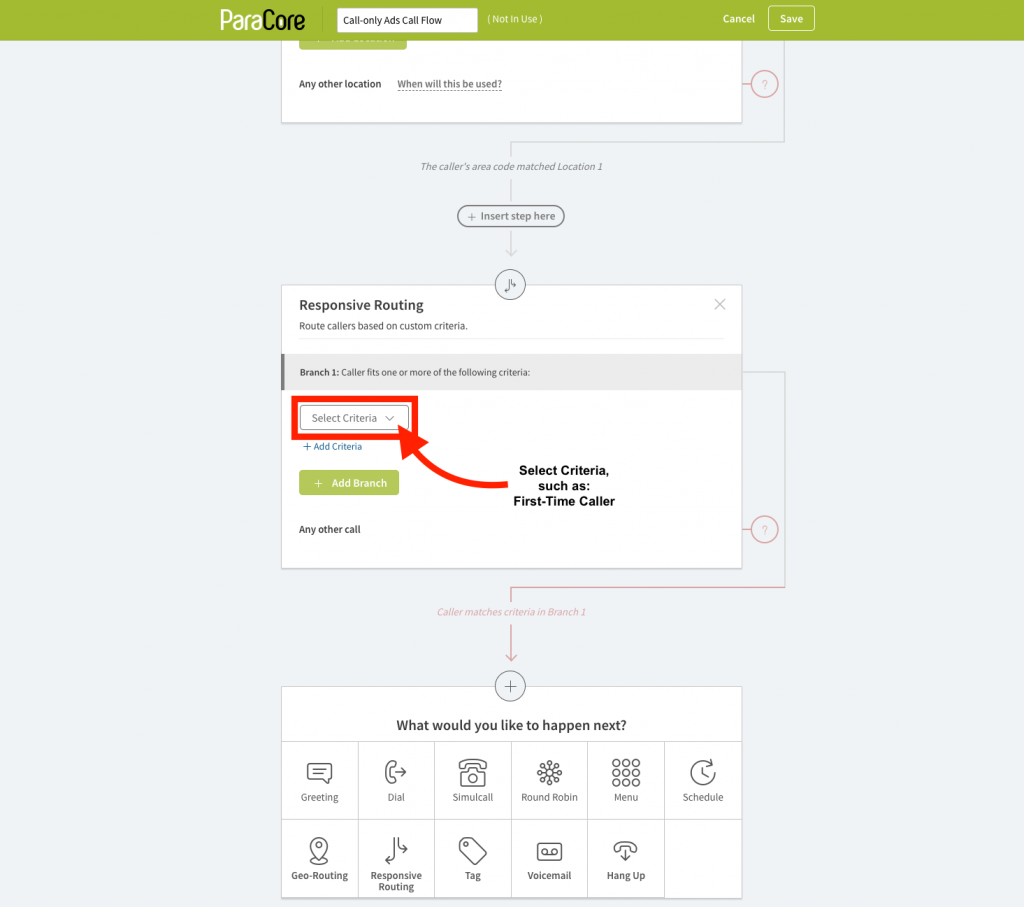 Figure 8.14: Responsive Routing.
Responsive Routing is another call flow feature that allow you to route a call by specific criteria such as First-Time Caller (see Figure 8.14 above). You can route calls by Repeat Caller, Source, Keyword, Active Page, Landing, Referrer, Campaign, Previous Lead Status, or Number Name. You can add multiple options and specify where to route the call on each. Something you might choose to do is tag a First-Time Caller as a Qualified Lead using the Tag call flow option (see Figure 8.15 below). You can literally do any combination of potential options so callers always reach the right person in your client’s organization.
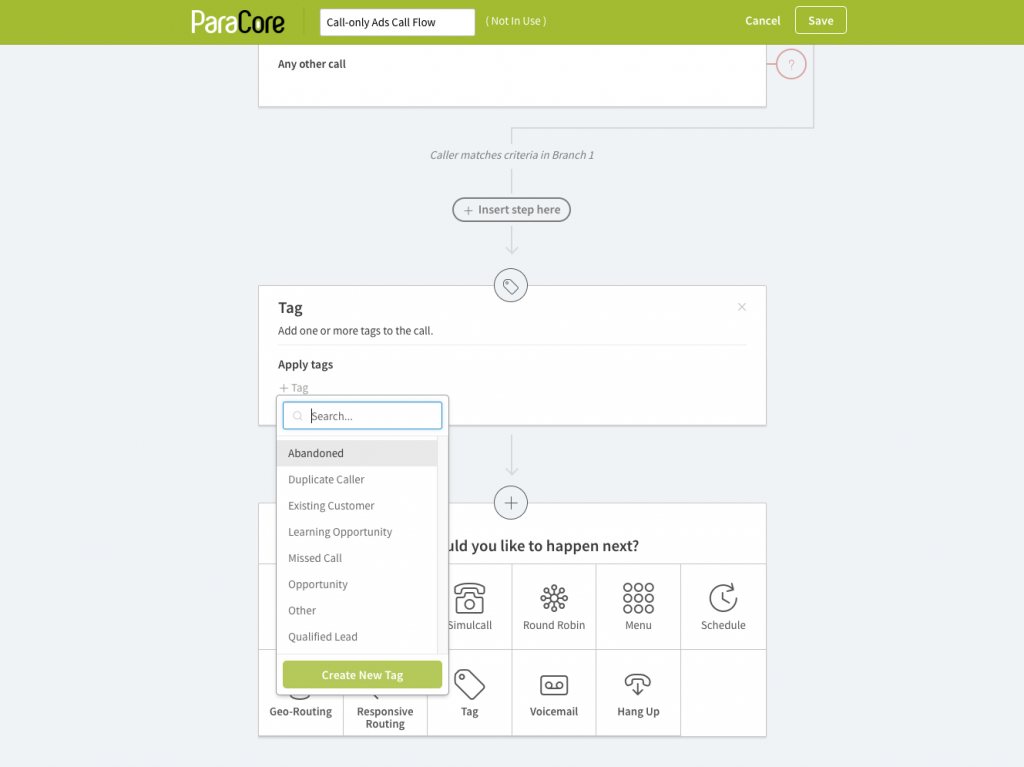 Figure 8.15: Responsive Routing: Tagging.
The last two choices, Voicemail and Hang Up, are self-explanatory and are typically your last options because they end the call flow. For Voicemail, again you can record your own message or have the robot do it by typing in the message you want read.
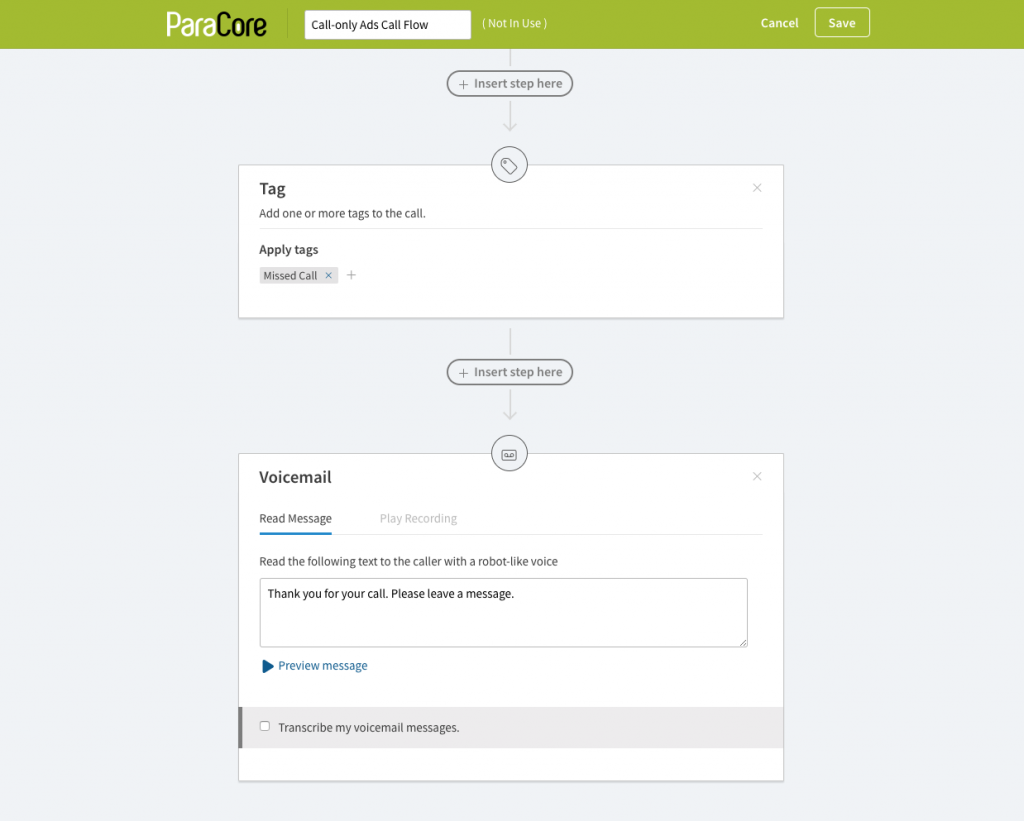 Figure 8.16: Voicemail set-up.
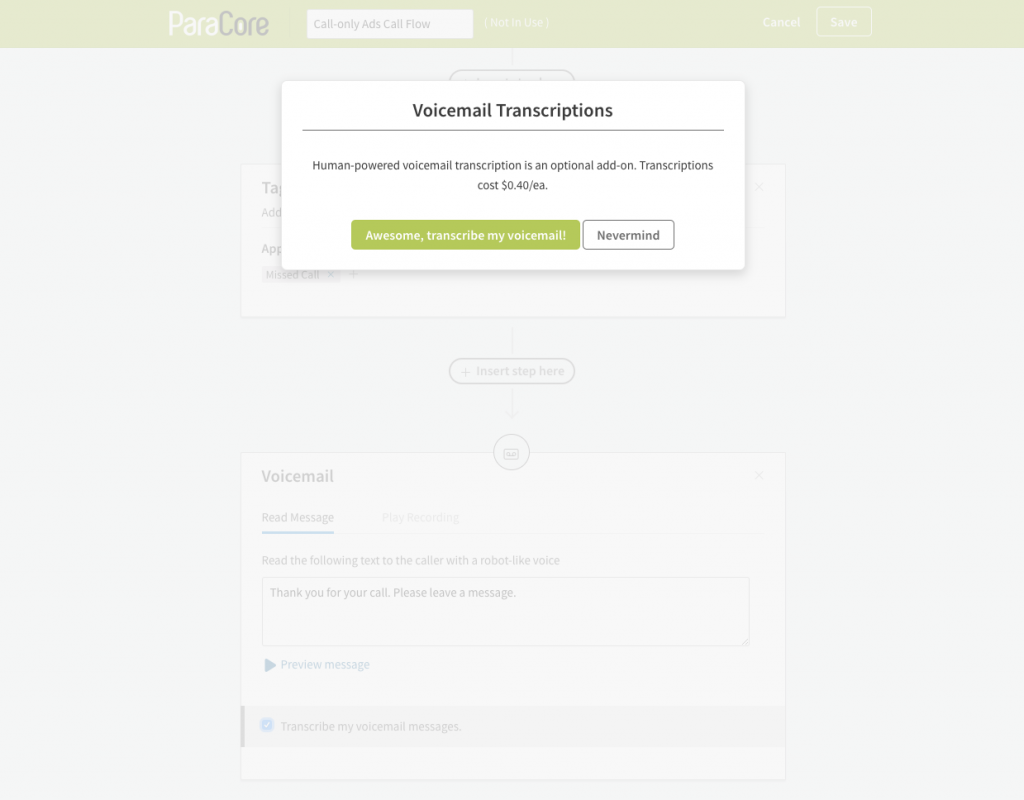 Figure 8.17: Voicemail Transcriptions cost extra.
You do have the option to have the voicemail transcribed for an additional cost of $0.40 per transcription. Once the caller has reached voicemail, the last step would be to hang up the call.
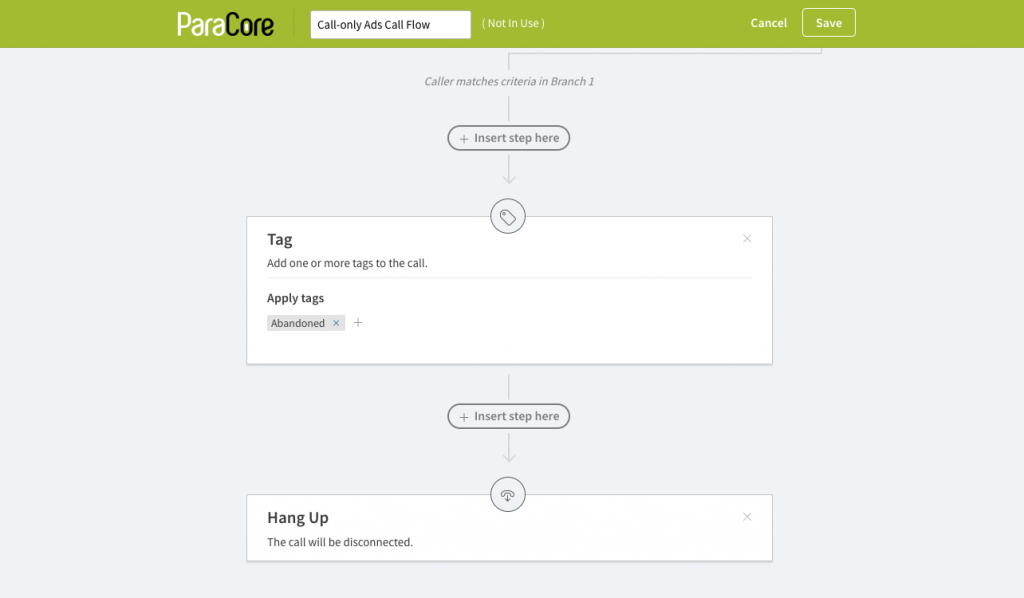 Figure 8.18: Hang-Up is the last option.
So there you have it, that’s your overview of setting up CallRail Call Flow for routing your calls. Make sure you check out our next video about How to Use CallRail for Customer Service Improvement.
If you enjoyed this video, please click the like button and make sure you click that red subscribe button below this video to receive updates on this series and more. Also, we’d like to hear from you. If you have questions or comments please post them below and I’ll see you in the next video!
Related Posts
- CallRail: Text Messaging
- CallRail: Integrations Overview
- CallRail: How to Block Spam Calls
- CallRail: Call Tagging
- CallRail: Notifications Overview
- CallRail: Activity Dashboard Overview
- CallRail: Interface Overview
- CallRail: Call Flow Tutorial
- CallRail: Form-to-Call Lead Handling
- CallRail: Multi-touch CPL Feature
- CallRail Keyword Spotting & Auto-tagging
- Call Tracking Overview
- CallRail Local Number Swap
- CallRail Bonus Features
- Using CallRail for Customer Service
- Reporting With A Purpose
- Call Tagging, Scoring & Lead Classification
- CallRail Notifications
- How to Setup CallRail Integrations for Your PPC Campaign
- Creating & Using Phone Numbers in CallRail
- Call Tracking Explained
Want In-Depth PPC Training?
Visit the ParaCore AcademyPrevious Video
Previous BlogReporting With A PurposeNext Video
Using CallRail for Customer ServiceNext BlogCurious how we can improve your campaigns?
Schedule some time to chat with our team so we can learn more about you and your business.

